Set Up Payment Registrations
Lesson progress:
The Payment Registration page is designed to support you in tasks involved in balancing internal accounts by using actual cash figures to make sure that payments are collected efficiently from customers. This payment processing tool enables you to verify and post individual or lump payments, process discounted payments, and find specific unpaid documents for which payment is made.
Before you start processing customer payments, because you can post different payment types to different balancing accounts, you must select a balancing account on the Payment Registration Setup page. If you always post to the same balancing account, you can set that account as the default and avoid this step every time that you open the Payment Registration page.
 ## To set up payment registration
Choose
 , enter payment registration setup, and then choose the related link.
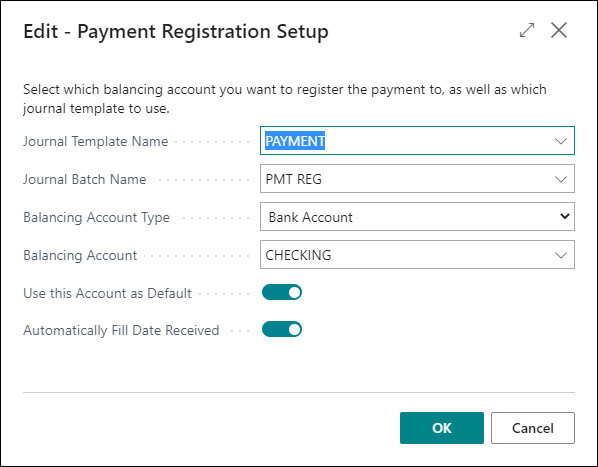
The Payment Registration Setup page opens.
In Journal Template Name and Journal Batch Name, specify the name of the journal template and journal batch on which the Payment Registration page is based.
In Balancing Account Type, specify whether the balancing entries are to be posted to a bank account or a general ledger account.
The field is defaulted by the selected journal batch, but you can always select another option.
In Balancing Account, specify the bank account or general ledger account that is to be used as the balancing account for payments.
To specify that the account in the Bal. Account No. field is to be used for all payments, turn on Use this Account as Default.
This field only applies when you use more than one account when registering payments.
To specify that that values for Date Received and Amount Received are to be automatically populated when Payment Made is selected, turn on Automatically Fill Date Received.
Next unit
Enable Customer Payments Through Payment Services
Feedback
To send feedback about this page, select the following link: